It is currently Fri Apr 19, 2024 6:14 am


M-Audio Keystation Mk3

Building organ consoles for use with Hauptwerk, adding MIDI to existing consoles, obtaining parts, ...
  • Author
  • Message
Offline

Whrrr

Member

  • Posts: 15
  • Joined: Sat Oct 20, 2007 11:44 am
  • Location: Oxfordshire, U.K.

M-Audio Keystation Mk3

PostSat Jul 11, 2020 12:06 pm

Hi everyone,

Does anyone have any experience of fitting a Mk3 keyboard within a timber keystack? The older Mk2 versions looked quite easy to fit, as it was possible to cut off the lower front part of each key to get a better look and to allow room below for pistons. When I unpacked a Mk3 I ordered, it seems they've changed the design so that right behind the "waterfall" vertical front there is a concealed tall cylindrical metal weight and the sides of the key also extend lower further back. This leave very little that can be cut off.

My concern now is if I can't cut much off the fronts of the keys, will this mean I can't fit pistons, or at least ones that look something like proper pistons.

Has anyone else had this problem and if so, how did you remedy it?

Many thanks,
Mark
Offline
User avatar

polikimre

Member

  • Posts: 676
  • Joined: Tue Sep 12, 2006 7:39 pm
  • Location: USA, NC, Cary

Re: M-Audio Keystation Mk3

PostSat Jul 11, 2020 8:03 pm

I'm in the same boat, only discovered it upon delivery. At this point I'm torn between going for a real waterfall design (would be hard with 3 manuals) or just switch to the Axiom.
Offline
User avatar

engrssc

Member

  • Posts: 7283
  • Joined: Mon Aug 22, 2005 10:12 pm
  • Location: Roscoe, IL, USA

Re: M-Audio Keystation Mk3

PostSat Jul 11, 2020 8:13 pm

Just asking because I'm not familiar with the Keystation Mk3, can a thicker piece of wood (to mount the pistons) be used to take up some of the space of the piston body, which would in turn bring the piston(s) basically further out quite near the front edge of the key? If at all possible, a channel could be routed on the back side for the wiring?

I normally use a wood strip approx 1/4" (6.3 mm) thick for the piston rail. Maybe use a 1/2" (12.7 mm) thick piece of wood?

Probably not a great idea, maybe someone has a better one.

Rgds,
Ed
Offline

Whrrr

Member

  • Posts: 15
  • Joined: Sat Oct 20, 2007 11:44 am
  • Location: Oxfordshire, U.K.

Re: M-Audio Keystation Mk3

PostSun Jul 12, 2020 3:01 am

That sounds like it could work. It may be possible to find a short-bodied push button. Great thinking!
Offline
User avatar

NickNelson

Member

  • Posts: 880
  • Joined: Tue Dec 20, 2005 10:31 am
  • Location: Yorkshire, UK

Re: M-Audio Keystation Mk3

PostSun Jul 12, 2020 4:27 am

Whrrr wrote:It may be possible to find a short-bodied push button.


I have used 'tactile' push buttons on occasion.

I know some people really don't like the short travel and click, but I don't find it objectionable if it's a choice between that or nothing. With care and, as as Ed suggests, by routing out the back of a wood strip as necessary you can get the switches and wiring within the depth of a 1/4" strip.

Image

Nick
Offline
User avatar

engrssc

Member

  • Posts: 7283
  • Joined: Mon Aug 22, 2005 10:12 pm
  • Location: Roscoe, IL, USA

Re: M-Audio Keystation Mk3

PostSun Jul 12, 2020 6:09 am

Do you have a part # and source for those push buttons, Nick?

Rgds,
Ed
Offline
User avatar

NickNelson

Member

  • Posts: 880
  • Joined: Tue Dec 20, 2005 10:31 am
  • Location: Yorkshire, UK

Re: M-Audio Keystation Mk3

PostSun Jul 12, 2020 9:15 am

Hi Ed,

I would have got them, some time ago, via Ebay.

UK ebay has these:

https://www.ebay.co.uk/itm/10pcs-12-x-12-x-10mm-Momentary-Tactile-Tact-Push-Button-Switch-DIP-w-White-Cap/183740688996?hash=item2ac7cc6a64:g:qpgAAOSwU8RekVtp

I'm sure they would be available from more reputable sources if necessary. Watch out though, the version with a flange
at the bottom of the actuator are more common, but more difficult to use.

Nick
Offline
User avatar

engrssc

Member

  • Posts: 7283
  • Joined: Mon Aug 22, 2005 10:12 pm
  • Location: Roscoe, IL, USA

Re: M-Audio Keystation Mk3

PostSun Jul 12, 2020 6:20 pm

Nice looking job, Nick. Appears white (w/o the flange) to be the most popular.

Rgds,
Ed
Offline

Whrrr

Member

  • Posts: 15
  • Joined: Sat Oct 20, 2007 11:44 am
  • Location: Oxfordshire, U.K.

Re: M-Audio Keystation Mk3

PostTue Jul 14, 2020 1:16 am

That looks very smart - neat work.
Offline
User avatar

NickNelson

Member

  • Posts: 880
  • Joined: Tue Dec 20, 2005 10:31 am
  • Location: Yorkshire, UK

Re: M-Audio Keystation Mk3

PostTue Jul 14, 2020 9:28 am

Whrrr wrote:That looks very smart - neat work.


Thanks Whrrr,

Not so neat around the back I'm afraid (rather like my hair at the moment):

Image

Out of interest, the depth of the rebate is about 2.7mm, and I must have done it with a router (though I
don't remember clearly) since it's too neat to have been taken out with a chisel.

Nick
Offline

larason2

Member

  • Posts: 764
  • Joined: Thu Feb 04, 2016 9:32 pm

Re: M-Audio Keystation Mk3

PostTue Jul 14, 2020 12:38 pm

Just curious, how come you used resistors in this case?
Offline

GrahamH

Member

  • Posts: 618
  • Joined: Tue Sep 09, 2008 6:39 am
  • Location: Near Manchester, England

Re: M-Audio Keystation Mk3

PostTue Jul 14, 2020 1:00 pm

Not so neat around the back I'm afraid (rather like my hair at the moment):


I beg to differ - that looks very neat indeed (as does my hair since last Monday)!
I did a similar exercise several years ago, mounting the tactile switches on stripboard. But it wasn't as neat as your installation and my buttons protruded a bit further than yours with the result that I kept triggering them accidentally whilst playing :cry:

Just curious, how come you used resistors in this case?


Those are not resistors - they are signal diodes.

Graham
Offline

Whrrr

Member

  • Posts: 15
  • Joined: Sat Oct 20, 2007 11:44 am
  • Location: Oxfordshire, U.K.

Re: M-Audio Keystation Mk3

PostTue Sep 01, 2020 5:04 am

Following up on this, I've found it's possible to modify the Mk3 keys by removing the "waterfall" fronts, but you also have to remove the weights and some of the sides, still leaving plenty to maintain strength. This is actually beneficial as removing the weights results in the return springs having less to contend with and so the action does seem to improve as a result.

Here is an unaltered key (note the weight under the front of the key):

Image

Here is a modified key, cut and weight removed, the cut tapered to meet the guide:

Image

I made a crude jig, but it's precise enough to keep all the cuts in the same place:

Image

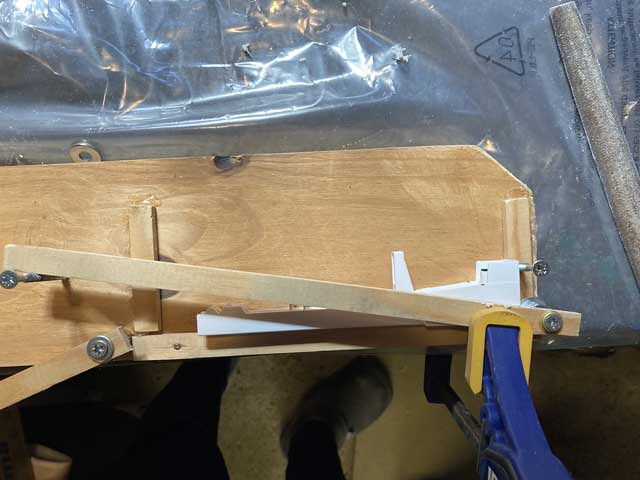
The clamp holds everything in place when the key is held in the right-angle stops with the angle guide on top. It has to be turned over and put in the other side of the jig to cut the other side of the key. The cuts are made with a Dremel 38mm plastic cutting disc. The guide is just that; not a rest, just a guide as it will wear away the wood over time. Finish neatly with a file, keeping the first key back as a pattern to compare the others to.

It's slow (who wanted four manuals?!), but the result is very pleasing:

Image

Hope this helps.

Return to DIY organ consoles / MIDI

Who is online

Users browsing this forum: No registered users and 2 guests